Monday, February 27, 2017

Event sub processes in Flowable 6

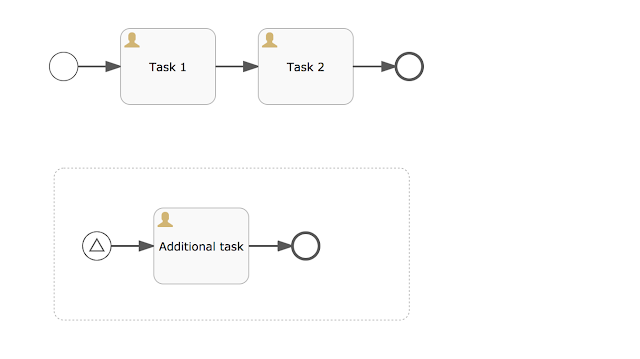
With the release of Flowable 6, we improved the support for event sub processes. In Flowable 5, the support for event sub processes is limited to the interrupting type. This means that if a signal event is triggered for an event sub process, the executions on the same scope are terminated. Let's look at a simple example process definition.

When a process instance is started, "Task 1" will be the active state of the process instance. When the signal start event of the event sub process is triggered, "Task 1" will be terminated and the event sub process is started and the current state of the process instance is "Additional task".

With Flowable 6 there's now also support for non-interrupting event sub processes. The only difference when designing the process definition is configuring the signal start event as not interrupting.
A non-interrupting start event is visually shown as a circle with a dashed line. If you would start a process instance for this process definition, again "Task 1" will be the active state of the process instance. But now, when the signal start event is triggered, "Task 1" will remain active, and an additional execution is created for the event sub process. Therefore, two user tasks will be active "Task 1" and "Additional task". 

Let's look at another example, that contains two event sub processes, one on the main process level and one nested inside a sub process.

When we deploy this process definition (as part of an app definition) to the Flowable Task application, we can test the process instance execution by clicking through the task application. Let's start a new process instance in the Flowable Task application and see "Task 1" being created. If you now query the REST API for active event subscriptions (on Tomcat with http://localhost:8080/flowable-task/process-api/runtime/event-subscriptions), you'll see the signal event from the event sub process on the main process level being available. 

We could trigger the signal start event, but let's complete "Task 1" first. Now "Sub task 1" is the active task and if you do another event subscription query, you'll see another event subscription has become active. Let's trigger the nested event sub process signal and validate if the non-interrupting behaviour works as expected.

With a REST client like Postman you can do a PUT request to http://localhost:8080/flowable-task/process-api/runtime/executions/{executionId}, with a JSON body defining the signal action and the signal event name.


In this example, the execution id is "12518". But you can look up the execution id in the event subscription query result. When this signal event is triggered, the "Additional sub task" of the event sub process should be created, while keeping the "Sub task 1" task active as well. The process diagram in the Flowable task application should look like this:

Now let's complete the "Sub task 1" task and notice that "Task 2" is not created yet. First we have to complete "Additional sub task". When both tasks have been completed, "Task 2" is created. When executing the event subscription query again, you'll see that there's only the main process level signal event remaining. The nested sub process event subscription is deleted and not available anymore. After "Task 2" is completed, the process instance is also completed and no event subscriptions are available anymore.

Non-interrupting event sub processes provide a great addition to add more flexibility to your process definitions and to be able to create additional user tasks, or execute additional service tasks, in specific use cases. With Flowable 6.0.0, non-interrupting event sub processes on the main process level are support, but with the upcoming 6.0.1 release also nested non-interrupting event sub processes will be supported in the Flowable Engine.


Tuesday, December 20, 2016

Coding introduction with Flowable 6

With the release candidate of Flowable 6 available, now is a good time to go back to the basics and look at how you can get started with using the Flowable 6 engine from scratch. Looking at all the modules available in Flowable 6, things can be a bit overwhelming. But with this simple introduction you'll see that it's really easy to get started.

All examples used in this article are available in the Flowable examples Github repository. The flowable-intro Maven project can be imported into your favourite IDE and you can play with the examples from there.

Now let's get started with a simple BPMN example project by creating a new Maven project and add the Flowable Engine as a dependency, like you can see in the following snippet.

Of course this pom file has a few more dependencies, like the H2 database and SLF4j API, but the only thing specific for the Flowable Engine is the flowable-engine dependency. Now we need to create a flowable.cfg.xml configuration file in the src/main/resources (or src/test/resources) folder:

We will use an in-memory H2 database to run the Flowable Engine. With the project setup and configuration file in place we can now create a BPMN process definition that executes a Java service task.

The IntroTask Java class will be executed when a new process instance is started for this process definition. This service task will set a variablePresent variable when the intro variable is present in the process instance.

Now let's implement a unit test that starts the Flowable Engine and runs a few tests for this process definition. In the first part of the unit test the Flowable Engine is started and the intro process definition is deployed to the Engine and a new process instance is started.

In the second part of the unit test we validate that in the first run the variablePresent value is equal to false, and in the second run (with an intro variable), the variablePresent value is true.

So with a few setup and configuration files, together with a service task class and process definition, it's really easy to start the Flowable Engine and execute a few test runs. You basically only need the flowable-engine dependency and a few supporting dependencies for the database and logging. Now let's enhance this setup and add the Flowable DMN engine to the configuration and unit test as well. First we need to add a few dependencies to add the DMN engine to the Maven project classpath.

With the DMN engine and configurator dependencies available we can now add the initialization of the DMN engine to the Flowable configuration.

This is all that is needed to run the DMN Engine together with the BPMN Engine and enable the DMN Task in the BPMN XML process definition. The database connection will be automatically shared in this configuration. It's of course also possible to run the DMN Engine separately. Let's change the simple BPMN example and add a DMN task instead of a service task.

The DMN task will execute the DMN decision table with key "intro" in the DMN Engine. The intro decision table will check if the name variable is equal to "Flowable" and set a resultVariable with value "is cool". If the name variable value is different, then the resultVariable is set to value "really?". The DMN definition can be found here.

With all definitions in place we can now test this setup and run the BPMN Engine together with the DMN Engine. The main difference is that we need to deploy both the BPMN XML file as well as the DMN XML file.

When the DMN Engine is available, the DMN file will be picked up by the DmnDeployer and will deploy it to the DMN Engine. The BPM Engine deployment id is set as a reference in the DMN Engine deployment, so the BPMN Engine is always able to correlate the DMN artefact to the process definition when that's requested. The rest of the unit test is very similar to the unit test we used earlier, and validates the process variable values. So by instantiating the DmnEngineConfigurator and adding it as a configurator to the process engine, we are able to use the DMN Engine via the DMN task. The DMN Engine is fully optional, but can easily be plugged-in when that's needed. A similar pattern is used for the Content Engine, to store process and/or task attachments.

To complete the introduction, let's also have a quick look on how to enable the Flowable 5 embedded engine. The Flowable 5 embedded engine is a handy way to migrate from the Flowable 5 Engine to the Flowable 6 Engine. All running process instances will be executed with the same logic as the Flowable 5 Engine, and existing process definitions will be labeled with the version 5 tag. New process definitions will be deployed as Flowable 6 process definitions by default, but this can be overridden using a deployment property. A possible migration strategy is to let the running process instances end on the Flowable 5 logic, and let all new process instances run with the new Flowable 6 logic.

To run the embedded Flowable 5 engine we need to add the compatibility dependency, that is again an optional component for the Flowable 6 engine.

We now need to enable the embedded Flowable 5 engine in the configuration file with the flowable5CompatibilityEnabled property.

When activating the Flowable 5 embedded engine on an existing Flowable database with running process instances, all existing process definitions and deployments will be marked as version 5 artefacts. This ensures that all running process instances will keep running against the same Flowable 5 logic. But in this test we start with a clean database, so let's now mark a new deployment as a Flowable 5 deployment.

With the DEPLOY_AS_FLOWABLE5_PROCESS_DEFINITION deployment property, this deployment is marked as a Flowable 5 deployment, and new process instances will execute with the embedded Flowable 5 Engine. As you can see in the unit test, the process definition is also marked with the "v5" engine version property.

With this article we tried to show that with Flowable 6, the same lightweight and modular approach has been taken as with Flowable 5 and that it's really easy to plugin the DMN engine and enable the Flowable 5 embedded engine. Also, the APIs are still the same so it should be easy to get started with the Flowable 6 Engine. Feedback is always welcome on this article and you can always ask questions and provide feedback on the Flowable forum.

Tuesday, November 8, 2016

Flowable 6 adds ad-hoc sub process support

With the first official release of Flowable 6 approaching we have added support for ad-hoc sub processes. It's a feature that shows the strength of the Engine refactoring we have been doing, because it's a fairly simple implementation on an Engine level. Let's have a look at what's possible with ad-hoc sub processes in Flowable 6.

We haven't updated the BPMN editor yet with the ad-hoc sub process symbols and properties, as this is an Engine feature in its current state. But the editor part will be added as well of course. So let's imagine the following embedded sub process to be ad-hoc.

The ad-hoc sub process contains two tasks without any sequence flow being defined. When a process instance is started from this process definition, an ad-hoc sub process execution is created in the Flowable Engine and no user task is created yet. For an ad-hoc sub process you can get a list of enabled activities, which refers to the activities that are available within the ad-hoc sub process to work on. So you can work on Task 1 and Task 2 in any order. With the following API call you can get a list of enabled activities from the Engine.

runtimeService.getEnabledActivitiesFromAdhocSubProcess(executionId);

This gives back a list of FlowNode objects that are enabled in the ad-hoc sub process for which the execution identifier is passed as parameter. In this example there will be two UserTask objects returned by this API call. So you can imagine a UI / application where a user can choose which task to work on next. The API call to start one of these tasks looks like this:

runtimeService.executeActivityInAdhocSubProcess(executionId, id);

So again the execution identifier of the ad-hoc sub process is provided, and in addition an identifier of the user task to select is provided as well. This identifier matches the id attribute of the user task element in the BPMN XML of the process definition. When this call is executed for Task 1 for example, the Flowable Engine will create a new user task, which will be available just like any other user task. 

An ad-hoc sub process by default can execute multiple enabled activities at the same time. This is defined with the ordering attribute in the BPMN XML definition. This means that we could also execute Task 2 in our example, while also having Task 1 active at the same time.

And what happens when Task 1 and/or Task 2 are completed. Without defining a completionCondition attribute in the BPMN XML, the Flowable Engine will not end the ad-hoc sub process execution automatically. The RuntimeService API provides the following method to complete an ad-hoc sub process when there are no active child executions (for example user tasks) anymore:

runtimeService.completeAdhocSubProcess(executionId);

After invoking this method our example process will continue to the After task activity and the ad-hoc sub process will be ended.

But invoking a method to complete an ad-hoc sub process isn't appropriate for a lot of use cases. So let's look at an BPMN XML example with a defined completion condition.

<adHocSubProcess id="adhocSubProcess" ordering="Sequential">
    
    <userTask id="subProcessTask" name="Task in subprocess" />
    <userTask id="subProcessTask2" name="Task2 in subprocess" />
      
    <completionCondition>${completed}</completionCondition>
    

</adHocSubProcess>

There are two differences with the previous example process definition. The first difference is the ordering attribute, which is set to Sequential. This means that only one of the user tasks can be executed at the same time. The Flowable Engine will not allow a second user task to be executed, when the first user task hasn't been completed yet. The second difference is the completion condition. This ad-hoc sub process will be automatically completed when the ${completed} expression evaluates to true. So, when we execute the first user task in the ad-hoc sub process and complete it together with a variable completed of true, the ad-hoc will end automatically after completing the user task.

Until now we have been demonstrating individual user tasks within an ad-hoc sub process only. But it's also possible to define individual task together with flows as well. Let's look at an example process model.


In this example Task 1 and Task 2 are enabled when the ad-hoc sub process is started by the Flowable Engine. So it's not possible to execute the other user tasks yet. When Task 1 is executed and completed, the Next task will be automatically created by the Engine, just like it would happen in a normal flow in a process definition. Using the completion condition, you can still determine when the ad-hoc sub process can be completed. And using the cancelRemainingInstances attribute it's possible to define whether the ad-hoc sub process should cancel any remaining executions / tasks when the completion condition evaluates to true. By default the Flowable Engine will cancel all other running executions / tasks, but when setting this attribute to false, the ad-hoc sub process will not complete before all executions / tasks have been ended.

The Flowable 6 Engine opens up a whole new range of dynamic behaviour in process instances. Because of its well defined execution structure and flexible API, there are a lot of new possibilities to add to the Engine. Ad-hoc sub processes is just an example as you will see more functionality appearing in Flowable 6 in the near future.

You can already play around with the ad-hoc sub process functionality on the master branch on Github (https://github.com/flowable/flowable-engine). We are looking for feedback from the community about this feature and other BPMN related features you would like to see implemented in Flowable 6.

Wednesday, October 5, 2016

Adding dynamic behaviour to the Flowable Engine

We have added a new feature to the Flowable Engine that I would like to share with you even before it's available as part of an official release. The new feature is the ability to change a defined number of properties of a process definition without needing to redeploy the process definition.

Before I'll go into details about this feature, some examples of needing to redeploy a process definition would be good to set the context. One example is a service task with a defined class name in the process definition. This service task is part of a big process definition, and process instances can be active for over a year. After deploying the first version of the process definition to the production environment the requirements of the process execution have changed and a new Java class should be executed for the service task instead. This means that new deployment of the process definition is needed and existing process instances need to be migrated to this new process definition.

Another example is a user task with a candidate group management. Over time, the requirements have changed and the sales group needs to be set as the candidate group for this user task. Again, this would mean a new deployment of the process definition and migration of existing process instances.

With the addition of the DynamicBpmnService interface these use cases can be solved differently, without the need to redeploy the process definition. For example, the DynamicBpmnService interface has a method to change the class name of a specific service task named changeServiceTaskClassName. Let's look at a code example to change the class name of the exampleTask service task.

<serviceTask id="exampleTask" 
  flowable:class="org.flowable.PreviousTask" />

ObjectNode infoNode = dynamicBpmnService.changeServiceTaskClassName(
      "exampleTask", "org.flowable.NewTask");
dynamicBpmnService.saveProcessDefinitionInfo("procDefId", infoNode);

After the invocation of the saveProcessDefinitionInfo method the Flowable Engine will now execute the NewTask class instead of the PreviousTask defined in the BPMN XML. As you can see we are using Jackson JSON for storing the overriding process definition information in the Flowable database. Every process definition can have zero or one entry in the new ACT_PROCDEF_INFO table. All changes for a process definition are defined in the same JSON object and stored as a BLOB in the Flowable database. The cache that's used to retrieve the process definition info data is versioned and designed to work in a clustered Flowable environment.

Let's look at one more example, changing the candidateGroup of a user task:

<userTask id="exampleTask" flowable:candidateGroup="management" />

ObjectNode infoNode = dynamicBpmnService.changeUserTaskCandidateGroup(
      "exampleTask", "sales", true);
dynamicBpmnService.saveProcessDefinitionInfo("procDefId", infoNode);

Again, after saving the JSON object, the Flowable Engine will use the sales candidate group for the exampleTask user task instead of the management group.

If you want to override multiple properties of a specific process definition in different steps you need to get the currently stored JSON object first. This is easy to do like this:

ObjectNode infoNode = dynamicBpmnService.getProcessDefinitionInfo("procDefId");

These are the properties we currently support to change with this approach:
  1. Service task - class name
  2. Service task - expression
  3. Service task - delegate expression
  4. User task - name
  5. User task - description
  6. User task - due date
  7. User task - priority
  8. User task - category
  9. User task - form key
  10. User task - assignee
  11. User task - owner
  12. User task - candidate users
  13. User task - candidate groups
And there's an additional feature we have implemented with the same approach, which is localisation. It's now possible to store the user task name and description in multiple languages in the process definition info table and when you query for tasks you can set a locale to use. The returned tasks will then contain the localised name and description as defined in the process definition info table. Let's look at an example:

<userTask id="exampleTask" name="Name" />

ObjectNode infoNode = dynamicBpmnService.changeLocalizationName(
      "es", "exampleTask", "Nombre");
dynamicBpmnService.saveProcessDefinitionInfo("procDefId", infoNode);

Task task = taskService.createTaskQuery().locale("es").singleResult();

The returned task instance will now have Nombre as the name of the task.

We are really excited about this new feature that's available in both the Flowable 5 and 6 code that's in Github, and we are eager to get feedback about this new feature. Let us know what you think about it and maybe come up with suggestions of which properties we could add to this approach in addition to the current supported list. We'll do a 5.18.1 release in a couple weeks time, together with a new beta release for Flowable 6, that will include this feature. And you can already create your own build using the code on Github of course.

Saturday, October 2, 2010

Mule 3 released

It maybe a bit strange to start of this blog with a post about Mule, but the release of version 3.0 of the Mule community edition is certainly a valid reason.

It's been a while since I wrote the book Open-source ESBs in Action with Jos Dirksen. But the coverage of Mule in that book was based on Mule 2.x, which was the current version until a few weeks. In the last couple of years other open source integration frameworks like Apache Camel and Spring Integration came along and provided similar functionality. With version 3.0 Mule steps up again and provides great additional functionality with foremost the following features: hot deployment, new flow based architecture, annotation support and better support for web services and rest.

I want to highlight two features of Mule 3.0 in this post, which are the new flow based architecture and hot deployment. Previous versions of Mule had a service based architecture to implement your integration logic. The following picture taken from the Mule userguide describes it in a very easy manner.

As the picture shows, integration logic was implemented via an inbound router to process incoming messages, via a service component to implement additional processing logic, and an outbound router for sending the message along the path. In XML this looked liked the following snippet:

<service name="hello">
  <inbound>
    <jms:inbound-endpoint queue="hello.in"/>
  </inbound>
  <component class="org.mule.TestComponent"/>
  <outbound>
    <pass-through-router>
      <jms:outbound-endpoint queue="hello.out"/>
    </pass-through-router>
  </outbound>
</service>

Nothing wrong with this kind of architecture, but it becomes a bit tricky when you have to specify all kinds of transfers, multiple component classes etc. The new flow based architecture solves these issues and provides a very clean and flexible architecture based on message processors and sources to implement your integration logic (see the following figure taken from the userguide).

All the things you want to do with a message after it has arrived at a message source is implemented with message processors. So transformers, routers and custom logic are all message processors. This makes it very clean and easier to understand. The new flow based architecture looks like this in XML:

<flow name="hello">
  <jms:inbound-endpoint queue="hello.in"/>
  <component class="org.mule.TestComponent"/>
  <jms:outbound-endpoint queue="hello.out"/>
</flow>

This looks very simple doesn't it? For a very small example like I've implemented here, the differences are not huge of course. But you can imagine that for more complex examples, the new flow based architecture makes your life a lot easier.

The other huge improvement in Mule 3.0 is hot deployment. One of the main differences between Apache ServiceMix and Mule when we wrote the Open-source ESBs in Action book was a hot deployment feature from an enterprise perspective. And now with version 3.0 it's there and looks very promissing. In the apps directory of the Mule installation you can now deploy a Mule configuration and JARs (if necessary) and Mule picks it up automatically. Then, if you want to change the Mule configuration you can simply update the file and again Mule picks it up automatically. For more information you can look at the userguide. Hot deployment now works for a lot of implementations, but there is still some room for improvement. For example, only the main Mule configuration file is monitored by Mule, not its child Mule configurations. When compared to other open source ESBs like Apache ServiceMix and Open ESB, I see that Mule takes a web application like approach to hot deployment, where the others use OSGi.

So to summarize, version 3.0 is certainly a step forward! It provides a lot of improvements and some great new features including the discussed hot deployment and the new flow based architecture. And from a perspective of the open source BPM Activiti project I'm enthousiastic about the possibilities of integration between Mule and Activiti. So I hope to see Activiti integration in the next 3.x version of Mule.